Do you worry a lot about the well-being and potency of your smart device’s battery? Want to check the battery health of your smartphone or computer? Battery health plays a major role in the functioning of any smart device. The health of the battery on your device also determines how much of a charge it can hold and for how long. As your device gets old, the battery starts to degrade. And that is why you should keep track of the battery health on your device. Whether it’s an Android smartphone or a tablet, all the Android devices come with excellent battery backup. Also, if you want, you can easily change the battery health of your Android device. Do you know you can get information about the battery health of your Android device?
Are you also a user of any Android device and wish to know how to check battery health? If you wish to know about the battery health of your Android smart device, you will have to read this full post. Here, you will be provided with the method using which anyone will be able to check the battery health level on their Android smart device. So, please go through this full post.
Checking the Battery Health on an Android Device
Checking the battery health of an Android smartphone or tablet is a straightforward task for anyone. There are multiple methods that you can follow for this. Even though Android provides a lot of information regarding battery usage, but there is no straightforward way to check the battery degradation. Here, you will see the most straightforward method applying which you will be able to track the battery health of your Android device.
Some Android devices allow you to check the battery health using hidden menus. If you find no issues with the battery on your device, there is no need to worry about it. You will have to go through some simple steps to find out about the battery health of your Android device. So, it’s finally time to get straight to the technique.
Method to check the battery health of an Android device
Go through the steps to check the battery health of your Android smartphone or tablet:
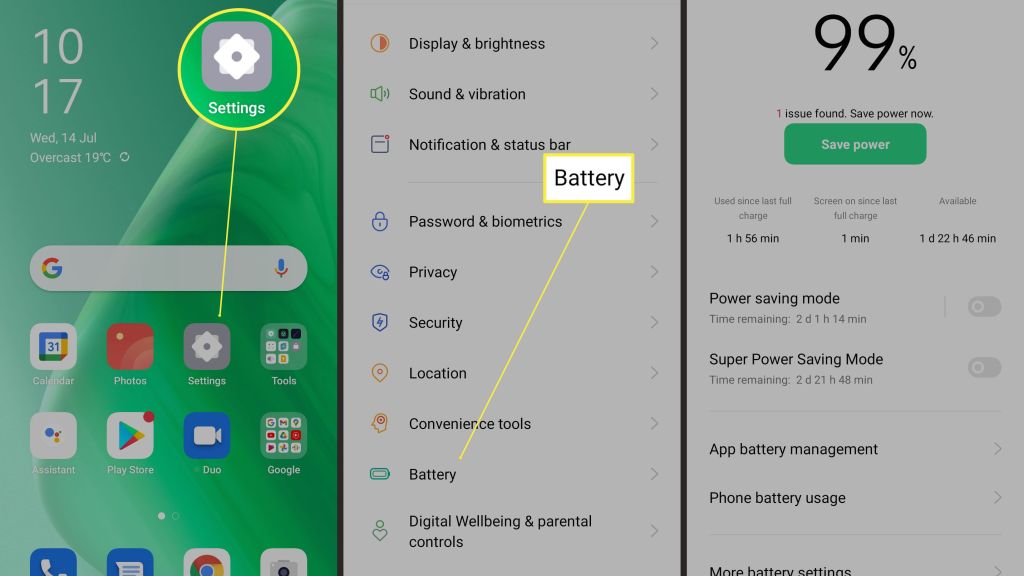
- To start with the method, first, you will swipe down from the top of the screen to bring the quick settings tiles.
- From the notification panel, tap the gear icon at the top left corner of the screen to get to the Settings window.
- After the Settings app opens on your screen, keep scrolling down to select the option of “Battery and Device Care.”
- And when you get to the Additional Care section, you will have to select the option of “Diagnostics.”
- Now, on your smart device, you will see a bunch of options for things on your screen.
- You will have to tap the battery status icon to proceed further. You will now be able to see some information about the battery. And this is all you will need to do to check the battery health of your Android device.
So, this was all about getting the information on the battery health of an Android device. Make sure you follow the steps carefully. And please stay connected to us for further updates by visiting our official website.
Visit: Rollo.com/setup
Source:https://rolloprintersupdate.com/how-to-check-battery-health-on-your-android-device/
When you are trying to open any program on Windows 10, and after some time, it freezes, then suddenly the “Program Not Responding” appears on your screen. You cannot shut the screen in this situation and cannot use any options. Many users are complaining about this error and struggling to find its solutions. Here are some instructions provided below.
Update your Windows 10 to Fix the Programming Error on Windows 10
If you wish to update Windows 10 to resolve this error, you need to execute the effective solutions below:
- Navigate to the Windows Search section on your PC.
- Then input ‘windows update’ and select the OK button to launch the screen.
- You should click on the ‘Automatic’ option through the drop-down menu of Startup Type, whether that is not already chosen.
- Now, hit the Apply and then OK buttons to verify the fresh settings.

Perform System File Checker to Fix the Programming Error on Windows 10
If you are attempting to execute the system file checker but you can’t, try the directions given below:
- Hold the Windows and X buttons simultaneously on the keyboard to invoke the Win + X menu.
- Thereafter, insert ‘sfc /scannow’ and select the OK button to start the scan process.
- This process takes a minimum of 15 minutes, and once finish the scan process, the Command Prompt screen might state, ‘Windows Resource Protection found corrupt files and successfully repaired them.’
- Now, shut the Command Prompt, then reboot the Windows.
Run DISM Scan to Fix the Programming Error on Windows 10
If you perform a DISM scan on your device, check out the quick resolutions below:
- Open the Command Prompt as administrator on the system.
- Thereafter, insert the pursuing line and hit the Enter button: DISM /Online /Cleanup-Image /RestoreHealth.
- Now, the DISM scan will begin. The scan takes a minimum of 20 minutes.
- After completing the DISM scan, check whether the issue still shows.
End Windows Desktop Manager Task to Fix the Programming Error on Windows 10
If you would like to end the Windows Desktop Manager task, continue with the possible instructions below:
- Hold the ‘Ctrl + Shift + Esc’ keys simultaneously on the keyboard to invoke the Task Manager.
- Once the Task Manager launches, find the ‘Windows Desktop Manager process,’ right-click on it, then pick the End Task through the menu.
Make Changes to the Registry to Fix the Programming Error on Windows 10
If you are trying to make changes to the registry, go through the effective solutions stated below:
- Hold the Windows and R buttons simultaneously on the keyboard to launch the Run section.
- After that, input ‘regedit’ into it, select the OK button and hit the Enter key.
- Navigate to the File option and then choose the Export option.
- You should change ‘Export range’ to All.
- Then input the preferred name of a file and select the button of Save.
- Once you have done, you will have a backup of the registry ready
- If anything goes incorrect after changing the registry, perform the backup file to restore the registry to the default state.
- Select the Edit option and then go to the Find option.
- Type ‘CoreParking’ or ‘54533251-82be-4824-96c1-47b60b740d00’ then select the Next button.
- Now, remove the buttons associated with CoreParking.
- Redo the 4th and 5th steps to locate each button associated with CoreParking and remove them.
Visit: mcafee.com/dellactivation
Walmart has lots of great deals for Christmas and to search your gift lists. Luckily, you can ship plenty of items with two-day shipping. You can order your deals with confidence also you will have your gift in time, getting time to wrap it under the tree. You can navigate the entire selection of Walmart’s last-minute deals above, but not all of them qualify for expedited shipping. We have some of the enticing items to bring you the absolute best gifts you can grab from Walmart’s Christmas deals. You can see our favorite deals that qualify for two-day shipping below.
Oculus Quest 2 (64GB, Refurbished)
Price: $199
Save $100
For purchases made during Black Friday and Cyber Monday, there were amazing deals on the Quest 2. We could get a free $50 gift card with purchase during these sales, but there was no actual price drop. Walmart is offering a great chance to grab one of the VR headsets for $100 less during the Christmas sale. Quest 2 64GB models are no longer available from the major retailers, but Walmart must have been saving a batch for the holidays. Walmart is offering one year warranty available with the new models.
Anker Eufy 25C Robot Vacuum
Price: $99
Save: $151
You don’t need to be worried about vacuuming your floors every day and offloading the task to someone or something else. By grabbing, this highly discounted Ankur Eufy robot vacuum is on sale for over $150 off at Walmart now. This is the best price down we have seen and is a stealing deal at $99. This 3-inch thick and slim shape robot vacuum cleans your couches and furniture and boasts 100-minute run time on a single charge. Note here only the Graphite color model is available for 2-day shipping.

Ninja Nutri Blender
Price: $30
Save: $60
Ninja Nutri Blender starts your day with a healthy and refreshing smoothie. It is a 600-watt base that blends all the ingredients directly inside the 20-ounce to-go cup for a mess-free breakfast. You can take it off the base, screw on the lid and have an easy and nutritious breakfast. Get this Ninja Nutri Blender for $30 saving your $60.
Samsung 2.1-Channel Soundbar and subwoofer
Price: $99
Save: $50
You get powerful, immersive sound right in your living room with Samsung Soundbar and subwoofer set. With a Bluetooth connection, you can place the subwoofer out of sight, enjoying the sound. Samsung 2.1-Channel set is compatible with other Samsung speakers as well.
Fitbit Sense smartwatch
Price: $200
Save: $100
Sense is one of the most advanced smartwatches to date to monitor many health metrics to help keep you in perfect shape. It tracks your heart rate and general activity throughout the day. In addition, it also detects electrodermal activity to warn you of rising stress levels and tracks your blood oxygen level and skin temperature at night. You can buy this smartwatch in the Walmart Christmas deals.
Acer Chromebook Spin 311
Acer Chromebook Spin 311 has 11.6-inch Chromebooks make up a massive section of the Chromebook market and the best blend of power, portability, and price. It comes with MediaTek MT8183C and 4GB of RAM. Spin 311 has a storage of 32-64GB and supports a battery life of 14 hours. Acer Chromebook Spin 311 has a 720p camera and a 45 W charger.
Visit: ij.start.canon
Have you recently purchased a new iOS device and love to capture a lot of pictures and videos on it? Apple is a well-known brand that produces various great smart devices. Among all the gadgets that this company designs, iPhones and iPads are most popular and commonly used among millions of users all over the world. Also, Apple releases updates for the operating system for all of its devices from time to time. And with every update, users get to enjoy many excellent features. A few months ago, Apple released the iPhone 13 series, which is now available to buy at a great price. iPhone 13 series introduced a camera with macro mode, but whenever the user gets close to a subject, the camera app automatically switches to the macro mode. And there are some users who want to disable the macro mode and automatic switching on their new iOS device.
Are you also a user of iPhone 13 and want to turn off the macro mode and automatic switching but don’t know how to do so? If you wish to get the procedure to disable this camera feature, you must go through this entire post.
Turning off the macro mode and automatic switching on iPhone
It is a much easier task for any iPhone user to turn off the macro mode and automatic switch on their iOS device. With the release of the iOS 15.2 version, the company added a new feature to the iPhone’s camera app. When you enable this feature and launch the camera app on your iPhone, a button appears within the app that allows you to turn off or on the macro mode manually. And as mentioned above, when you get closer to a subject to capture its image, the iPhone’s camera app jitters. By activating the macro mode and shifting from a regular wide lens to an ultra-wide lens, the iPhone’s camera app helps you to capture more details of the subject.
However, if you don’t like this feature, you can turn it off by going through the settings app on your iOS device. To do so, you will have to follow a simple procedure that includes some steps. You can prevent the camera app on your iPhone from automatically switching to the auto macro mode.

Instructions to enable the macro-control on iPhone
Follow the instructions to enable the macro control to turn off the macro mode and automatic switch on your iPhone:
- To get started with the task, first of all, you will have to make sure that your iOS device is running the latest iOS version. And if you haven’t upgraded your device yet, check out the guide on our website.
- You will now have to launch the Settings app on your iPhone from the home screen.
- If you are unable to find the app, you can use Apple’s inbuilt spotlight search feature also to find the Settings app.
- After reaching the Settings screen, scroll down to tap on the option of “Camera.”
- Now, turn on the toggle switch for the “Macro Control” option found at the bottom of the menu.
- And after you are done following the above steps, you can close the Settings app and launch the camera app on your iPhone to test it.
- Move your iOS device close to a subject to capture a picture, after which you will be able to notice that the Camera app switched over to the Macro mode.
- You will also be able to see a new icon in the preview with the image of a flower. If the button is highlighted in yellow color, that means the macro mode is turned on.
- To disable the mode, tap the button, and then your iPhone’s camera will switch back to the lens, whichever you were using before. And that’s it.
So, this is how you can turn off the macro mode and automatic switch on your iOS device, running the latest iOS version. So, now you know how you can disable the feature, follow the procedure now. And please let us know if you face any difficulties. To know more about the latest iPhone 13 series, you can take a tour of our official website.
Visit: ij.start.canon
Spider-Man: No Way Home ending makes many reveals about MCU’S future. Pushing the envelope regarding what the multiverse concept means for Spider-Man and the MCU, Spider-Man: No Way Home ending changes how fans will see the previous MCU movies.
The Spell Is Where It All Starts for Spider-Man: No Way Home
Showing the aftermath of Peter’s identity revelation as Spider-Man with the end of Spider-Man: Far From Home, Spider-Man: No Way Home suggests that Peter wants to fix the situation. The movie shows the struggle of the 17-year-old wishing to protect his near ones by fixing up the problem. And the only way that seemed effective was a spell cast by Doctor Strange to make people forget who Peter is.
However, things don’t go as planned, and the spell opens a crack in the multiverse. The crack becomes a getaway for the arrival of the 17-year old’s rivals. Further, this includes the arrival of Doc Ock, Electro, Green Goblin, Sandman, and the Lizard from alternate universes.

What Did Spider-Man: No Way Home Ending Explained
Spider-Man No Way Home shows all three versions of Spider-Man- Tobey Maguire, Andrew Garfield, and Holland. And how the three of them worked as a team to find the cures for each of their villains. Furthermore, these villains wanted to fight with the web-slingers to obtain more power.
In an attempt to clear his name, Peter lets the public decide whether or not he is worth their support. And after battling with all the villains, Spider-Man and his team successfully cure Green Goblin, Sandman, Doc Ock, Electro, and the Lizard. Moreover, all the villains were turned back into the non-altered humans they were before.
Spider-Man: No Way Home Ending Marks Several Realizations
With the ending of Spider-Man: No Way Home, the web-slinger realizes that the only way to save the world is the completion of Doctor Strange’s spell. As the spell erases Peter’s identity from the world, the 17-year-old goes back to square one as a superhero. And for now, Spider-Man is completely alone in the world with no help from anyone.
What Doctor Strange’s Spell Does to The MCU Timeline
Spider-Man: No Way Home ending rewrites the history of popular MCU villains, including Sandman & Electro, in their respective movies. And it further explains a second chance given to them after being cured and returned to their alternate timelines. Furthermore, the Spider-Man: No Way Home ending alters the MCU’s past & future. As none of the villains remember the web-slinger anymore, the Avengers’ history will be reshaped for him. With everyone forgetting about the 17-year-old completely, watching how other Avengers will remember the history will be interesting. There is a high chance that no one will remember the 17-year old’s help in fighting with Thanos. The web-slinger removal from Marvel’s timeline changes how every other superhero will remember the past events, affecting top Marvel movies, including Avengers: Endgame. With Spider-Man: No Way Home ending, Spider-Man’s timeline gets a fresh start affecting his role in MCU’s future.
Visit: ij.start.canon
If you are trying to play the video on Google Drive and face a problem with this video’s error due to the corrupt application/browser cache or wrong browser configuration. So, if you are troubling these issues, then here are the instructions given below.
Remove Browsing Data to Solve Google Drive Not Playing Videos Issue
If you are unable to remove browsing data on your system, then you must go through the effective solutions mentioned below:
- Firstly, invoke the Google Chrome browser on your system.
- After that, click on the vertical ellipsis menu icon at the top right side of the screen.
- Then choose the More Tools option.
- You should reach the sub-menu section and select the ‘Clear Browsing Data’ option.
- Go to the ‘Advanced’ section. Click on the time range option of All-time.
- Thereafter, click on the categories option that you would like to remove data.
- Later, select the button of Clear Data when you have done it.
- Once you verify the actions, reopen Chrome and check whether you should play the videos on Google Chrome.
Launch the Video in Different Window
If you are trying to play the video on another screen, but you fail, then go through the process stated below:
- You should invoke Google Drive then choose the file of the video.
- Then click on the vertical ellipsis menu icon at the top right side of the screen, choosing the ‘Open in New Window’ option.
- Now, check whether the video has begun to play.
Turn off Extensions/Add Ons of Browser to Solve Google Drive Not Playing Videos Issue
In order to disable the extensions/add-ons of the web browser, proceed with the effective directions stated below:
- Firstly, invoke the Google Chrome browser, then select the menu of Action.
- Thereafter, reach the section of sub-menu and select More Tools.
- Then click on the Extensions option.
- You should switch the toggle of each extension to disable it.
- Finally, reopen the Chrome browser and check whether the videos have begun to play into Google Drive.

Use Another Browser to Solve Google Drive Not Playing Videos Issue
If you cannot use another browser on your system, then follow the possible instructions explained below:
- Firstly, you have to download another browser.
- The freshly installed browser then invokes Google Drive to look at whether you should start the videos into it.
- In case you should, consider installing the corrupted browser again.
Change Network Temporarily to Solve the Issue
To modify the network temporarily on your device, perform the quick steps stated below:
- You should temporarily use ‘switch your network’ or a reputable VPN.
- Thereafter, the problem is fixed. Otherwise, you should move back to the network.
Using the Right Google Account to Solve Google Drive Not Playing Videos Issue
If you are using an incorrect Google account, you may face the issue of Google drive not playing videos. In order to rectify the issue, follow these steps in the explained manner:
- Firstly, open the Chrome browser and reach the upper right side of the screen.
- Then select the ( i ) button of the account next to the vertical ellipsis menu icon.
- After that, select the Add button and input the profile username.
- You will see a freshly made profile on your Chrome.
- Select the User button next to the menu of action.
- Thereafter, click on the ‘Turn on Sync’ option.
- Now, launch Google Drive then check whether the issue is fixed.
Download the Video File to Solve Google Drive Not Playing Videos Issue
If you face any issue while downloading the video file on your system to solve the Google drive issue, then continue with the effective instructions provided below:
- You should invoke Google Drive then choose the video.
- After that, select the ‘More’ actions option and then choose the Download button.
- Finally, once you download the video file, start it via the media application of the system.
Visit: ij.start.canon
Source: https://xn--jstartcnon-y4a0l.ijstartuk.com/try-these-fixes-to-solve-google-drive-not-playing-videos/
Recently One Plus has suspended buggy OxygenOS12 (Android 12) for One Plus 9 and 9 Pro smartphones. According to early news updates related to the One Plus 9 series, One Plus has suspended the roll-out of the OxygenOS12 update for its 9 and 9 Pro /smartphones. The users experienced the One Plus OxygenOS12 earlier this week and found a few notable bugs, including bad animations, inconsistent performance, Wi-Fi speed issues, trouble with calls, and more.
One Plus 9 and 9 Pro users have reported major issues, and these issues are believed to be arising after switching from Oxygen OS to Color OS codebase. During this transition, various settings and features are not transitioning properly.
The statement from One Plus
One Plus said that they would release a bug-free update soon. They further said that they are aware of the issues arising from the OxygenOS12, and their software team is fixing the issues. They will suspend this software and roll out a new iteration as soon as possible.
One Plus 9 and 9 Pro specifications
One plus 9 and 9 Pro have a left-aligned punch hole cut-out slim bezels and an in-display fingerprint sensor. One Plus 9 has a 6.55-inch Full HD+ screen with a resolution of (1080 x 2400 pixels), and 9 Pro comes with an IP68 rating and a 6.7-inch QHD+ LTPO AMOLED display with a resolution of 1440 x 3216 pixels. Further, these One Plus smartphones offer a 120 Hz refresh rate and HDR10+ support.
These One Plus smartphones are powered with a Snapdragon 888 chipset that offers 12GB of RAM and up to 256 GB of storage. Further, these smartphones pack a 4500 mAh battery with 65 W fast-charging support. Handsets support Wi-Fi 6, Bluetooth 5.2, GPS, 5G, and Type-C port connectivity.
The users of One Plus are complaining about the loss of several customization features because Oxygen OS was known for having the most customizable Android features. The users are reporting different types of bugs in these smartphones, including slow Wi-Fi speed and poor animations.
A-One Plus community member has provided a simple guide to roll back to the previous Oxygen OS version to those who have already installed the update.
Conclusion
As per the report, One Plus users are reporting different types of issues in the One Plus 9 and 9 Pro smartphones. The notable concerns are slower Wi-Fi speed, bad animations, inconsistent performance, trouble with calls, and more. The issues are arising due to an OS transition made by One Plus. However, the One Plus software team has ensured the users with a bug-free update soon. According to a One Plus representative, they are suspending this buggy OxygenOS12 update and will roll out a new iteration soon. They have also released a simple guide to those who have already installed the update and how they can use the previous Oxygen OS version.
Visit: mcafee.com/activate
There are many games that you can play on PS5. Few of them are specially designed for Sony’s newest powerhouse. We have accumulated some of the finest games you can easily play on PS5 today and can categorize them to browse according to your interest or the game you like the most. From RPGs to kind of multiplier games and free-to-play, we have provided you with whatever is needed.
Including in this list, we have tried to adhere to newly released games on PS5 versions and the latest updates to favor its extra power. The remaining things assured that it’s not the complete list of everything available on the system right now. To know more about that, you would require to look out for the best PS4 games. As more new games will be released in the coming months, we will diversify and add other categories.
BEST RPGs For PS5
Role-playing games have passed out the time test and are frequently some of the most famous. Not many numbers of RPGs are designed for the PS5 at present, but some of them are useful for your time. And still, if this much is not sufficient for you, the PS4 has a huge backlist of RPGs to continue with.
- The Elder Scrolls V: Skyrim Anniversary Edition
- Marvel’s Guardians of the Galaxy
- Tails of Iron
- Eldest Souls
- Diablo II: Resurrected

Best Action and Adventure Games for PS5
Action and adventure can be defined differently by different people, especially in a case when the category is customarily borrowed from other people. For some instances, it’s very easy to specify Assassin’s Creed Valhalla as an action RPG. Whatever the reason, the action and adventure titles form up the majority of the AAA market, outward shooters, and there are great numbers of great ones on PS5.
- Ghost of Tsushima Director’s Cut
- Ratchet and Clank: Rift Apart
- Spider- Man-Miles Morales
- Guardians of the Galaxy
- Immortals Fenix Rising
- No Man’s Sky
- Watch Dogs: Legion
Best Shooting Games for PS5
There is something unique or different about the good shooter compared to the first person and the third person. You can destroy the devil from hell, wipe out the army of aliens, cut down the terrorists- There is no shortage of what you can do and what monsters you can kill. It doesn’t matter what, but in the end, you will be the winner or hero at any cost in any of these amazing shooter games on PS5
- Death loop
- Borderlands 3
- Rainbow Six Siege
- Doom Eternal
- Destiny 2- Beyond Light
Conclusion
Many other games on PS5, like free-to-play games and horror games for kids, are also available. Playing such interesting games on PS5 would be an amazing thing to do. You are getting this much entertainment on a single platform by using some of your skills.
Visit: ij.start.canon
Source: https://xn--cannijsetup-seb.ijstartij.co.uk/best-rpg-action-adventure-and-shooter-games-for-ps5/
The Halo Infinite gameplay includes several boss fights, and Tremonius is the first boss you will fight in the Halo gameplay. You should maintain a proper distance while fighting him. In short, the key is keeping a fair distance. In this article, we are sharing some tips to start your winning streak of boss fights so you can win on the first try. The Tremonius Boss Guide offers you a helping hand during the fight in the Halo Infinite.
Halo Infinite- Foundation Mission
If you are a Halo Infinite player and currently on the Foundation mission, you will have to fight Tremonius at the end of the mission. We help you win the fight and complete the mission. You can earn more rewards and XP by completing other missions. It will also offer you new perks. You can visit different places to improve your skills.
Halo Infinite- About the First Boss Tremonius
Tremonius is equipped with heavy armor. Additionally, he is accompanied by two jackals. These jackals are also equipped with armor. In short, together, they can take you down easily. However, you can easily beat Tremonious to stay forward on the second level.
Tremonius provides a tough encounter during the campaign missions. You should win the fight to progress.
Halo Infinite- Dodge Attacks
You should not worry about the basic attacks, but do not get too close. The fireball attack can kill you instantly in one single blow. Sprinting or jumping out will not save your life. As soon as you see the Tremonius jumping into the air, use the grappling hook and escape to another area in Halo Infinite. Go as far as possible to avoid the attack.

Halo Infinite- Maintain Proper Distance
You will get a cutscene introducing Tremonius. Do not rush and fight him up close after the cutscene ends. Tremonius is heavily armored, and jackals will quickly take you down. The first step is to move back when he jumps at you. Jackals will not be able to shoot you because of the spires. In other words, it blocks them from shooting at you.
Halo Infinite- Kill Jackals
Use the Plasma weapon to fight. It takes down his shields quickly. Their shields have a white bar on them, and they do not recharge. After taking down their shield, you should switch to any kinetic weapon in the Halo Infinite.
Create a gap between you and Tremonius. Go nearby pillars and find the Jackals. You can take them out, they have Manglers, and they can take you down if you are close enough. If you do not want to use the grenades, shoot the pink containers to blow them up.
Halo Infinite- Kill Tremonius
Your fight with the Tremonius gets much easier once you clear out the Jackals from your way. Keep avoiding his fires by taking covers. Believe in your kinetic weapon and grenades. He will eventually go down in a few minutes. You should keep dodging his attacks during the Halo Infinite gameplay until then.
Conclusion
Halo games always have bad bosses. They can easily take you down if you don’t have any strategy. You can follow the steps mentioned above to beat the Tremonius on your first try in the Halo Infinite game. DO not forget to use Grenades and plasma weapons to take down the shield. You can read our other articles to get the details related to other games. If you have any further queries, please comment down below.
Visit: ij.start.canon
Naoki Yoshida is the director and producer of Final Fantasy 14. He has apologized to the players because of the login problems in the early access of Endwalker. They will offer 7 days of free play time starting from the 7th of December. The game has new jobs for players and new regions to explore.
The Final Fantasy 14 website published a post related to the issue and frustrations of the players. You can get 7 days of free playtime by the given procedure.
Final Fantasy 14 Endwalker: Login Issue
Everyone is facing login issues worldwide. Players get a lot of login queues, especially in peak hours. The issue started emerging after the early access release of Endwalker. The game was just released last week.
The players attempting to access Final Fantasy 14: Endwalker faced several error codes, including 5006, 5003, 4004, and 2002. The popularity of the Final Fantasy 14 game has increased recently. Square Enix has developed a new character. It also raises the level cap to 90 from the level of 80.

Final Fantasy 14 Endwalker: Common Errors
Some of these errors include connection timeouts that tend to login queues for a long period of time. If more than 17,000 players are in the queues, players receive a 2002 error code.
Final Fantasy 14 Endwalker: Solution
The recent post on the Final Fantasy 14 website does not state or offer any solution. It only says that the players should use hard-wired internet connection to improve the connection stability. It is the best solution to solve the login issue in the Final Fantasy 14 game.
Final Fantasy 14 Endwalker: Compensation
Yoshida also addressed compensation for the players because the ongoing issue asks players to wait in queues for a long time. As a result, the current situation makes it difficult to play the games normally. The game was officially released on December 7.
Get 7 Days of Free Playtime in Final Fantasy 14
The studio offers 7 days of free game time to all the players who own the full version of the game. If you have an active subscription, you will also get free playtime. It also includes those players who are currently using the 30-days trial period of the game.
They might also offer an additional game as compensation in the near future. However, the Final Fantasy 14 developers did not declare the timing of the free playtime period. The studio will announce it later.
Conclusion
There are still several issues in the early access gameplay. You might get several server issues because of the congestion. The gameplay does not have any other new worlds in the Final Fantasy 14: Endwalker launch.
Visit: ij.start.canon
There are a few conditions when the application does not appear on the home screen, even when installed on the iPhone. It can occur when you have selected to have the freshly installed applications only inside the App Library. If you hide any app from the Home screen on your iPhone, the applications will also not show as the pages are hidden. But what if you wish to remove an app that doesn’t show over the Home Screen? Well, there are multiple other processes to delete an application that is hidden on your iOS device. In these step-by-step guidelines, we will be covering a method of removing an app via the iPhone’s Settings app.
When iOS 14 was rolled out for iPhone users last year, Apple added several major changes to the interface, and that also included the ability to hide apps from the home screen, adding an app library, and much more than that. Recently, the iOS 15 version has been launched for users, and it also includes multiple great features. However, there are some things that remain the same. For instance, you can delete any hidden apps in iOS 15 in the same way as you do so on iOS 14. You will have to read this full post to see how you can delete any hidden apps installed on your iOS device.

Deleting any hidden apps on iPhone
Any iPhone or iPad user can delete any hidden apps installed on their device. Usually, to delete any app from your device, you tap and press the app icon on the home screen and then hit the delete button. To delete the hidden apps from your iPhone, you must follow some simple steps. Please take a look at the procedure mentioned below.
Instructions to delete any hidden apps on iPhone
Go through the instructions to delete any hidden apps from your iPhone:
- To get started, firstly, you will launch the Settings app on your iPS device.
- In the Settings screen, scroll down to tap the “General” option.
- And when you reach the General Settings screen, locate the option of “iPhone Storage” and tap on it to proceed further.
- Now, you will be able to notice the list of all the installed apps appearing on your screen.
- Choose and tap the app that you would like to remove from your device.
- At last, tap the “Delete” option to remove the app from your device. And that’s it.
So, this is how you can delete any hidden apps from your iOS device. Try the given method right away if you also own an iPhone or iPad. And please keep visiting our website to stay connected to us.
visit: support.brother.com
Source: https://globalsofthelp.wordpress.com/2021/12/13/how-to-delete-hidden-apps-from-your-iphone/
Apple is openly supportive of people’s security and privacy as it offers plenty of features that enhance privacy and the security of its users’ data. The CEO of Apple, Tim Cook, says that privacy is one of the essential human rights. On Apple’s data and online privacy platform, you can see what Apple has arranged for its users to safeguard their privacy and data. You could also access the portal to modify your details saved by Apple, including removing your Apple ID as well as your data associated with it. Users can also download a copy of their data reports.
How to Access the Data and Privacy Portal of Apple?
Follow the explained guidelines mentioned below to access the data and privacy portal of Apple:
- If you wish to hold control over your private data or just want to know about what Apple has stored in their server about you, then do follow the steps mentioned down:
- Open your web browser and then visit ‘privacy.apple.com’, and you will land directly on Apple’s Data and Privacy website platform.
- Now sign in to your Apple account along with your Apple ID and your password.
- If asked to type into a two-factor authentication code, press on Continue.
- From there, you will be required to choose whether you wish to modify your private data saved by Apple, and in case you wish to delete your Apple ID and the data it contains, you can do so from there.

How to Change Your Account Details via Apple’s Data and Privacy Portal?
Follow the explained guidelines mentioned below to change the account details using Apple’s data and privacy portal:
- On a web browser, go to ‘privacy.apple.com.’ Next, enter your account ID and password.
- When prompted, type in the two-factor authentication code.
- Tap on the Continue option.
- Head to the Get Started option located below to the Correct Your Data heading.
- Now, look at the sections to use and modify your Apple ID details and information related to the Apple Store transactions.
- To manage and optimize your Apple ID account details, visit appleid.apple.com.
- To manage the transaction of your Apple Store, shipping preferences, and billing details. You can also change details like the iPhone Upgrade Program and other things from there.
How to Delete Apple ID Account via Apple’s Data and Privacy Portal?
Follow the explained guidelines mentioned below to remove the Apple ID account using Apple’s data and privacy portal:
- Head to privacy.apple.com and log in to your account.
- Then, use the two authentication codes to complete the process.
- Press on Continue to get in.
- Next, navigate to Get started.
- Examine the details related to the removal of your account.
- Apple should now confirm your deletion requests and speak that the course might take seven days to finish.
- Now obey Apple’s recommended prompts (like backing up user data and logging out of all devices.) prior to deleting the account.
- Select a reason for account deletion by accessing the pull-down options.
- Press on Continue.
- Now, go through the details related to your account deletion once more.
- Head to the Continue option.
- Read the Terms and Conditions of the Deletion and tick the checkbox to verify that you have read and accepted the conditions.
- Tap on Continue.
- Select a contact mode, which would be for telling your account status updates.
- Press on Continue.
- Type or print the unique access code you got.
- That could be used for confirming your identity in case you want to reach Apple Support.
- The code will be used for canceling your process of account deletion.
- Write down your access code to verify it is you.
- Tap on Continue.
- Go to the Delete account to remove your Apple ID account as well as your data in it.
- Soon, Apple will begin the confirming procedure prior to removing your account.
- The account would remain in life during the process of verification.
- That can consume up to 7 days at max to get done.
Visit: mcafee.com/dellactivation
Source:https://globalsofthelp.wordpress.com/2021/12/03/a-complete-guide-to-apples-new-data-privacy-portal/
In case you forget the password or passcode of your iPhone, you know how difficult it can be. Every image, contact, social media account, and many more are securely tucked away among that lock display, but you are unable to see any of them. If you want to reset your iPhone’s passcode or password, then here are some directions below.
Recover Forgotten Apple ID to Repair the iPad Password
If you face hurdles during recovering a forgotten Apple ID, carry out the steps in the same way as explained below:
- First, visit ‘appleid.apple.com’ on your device.
- Afterward, select the ‘Forgot Apple ID or password’ option.
- You should input the email ID related to the Apple ID and select the Continue button.
- Now, verify the contact number and hit on the Continue button.
- Then Apple will share notifications to all devices that are logged in with the Apple ID.
- Select the Allow or Show button according to the device you are utilizing, then pursue the steps to reset the password.
- If you cannot use a different mobile, Mac, or iPhone, select the ‘Don’t have access to your devices?’ on the lower side of the Apple ID website.
- The next screen gives extra choices to reset the password of Apple ID:
- Reset the password while logging on to a new device.
- Use ‘Find My iPhone’ on anyone else’s iOS device.
- Use ‘Find My iPhone’ on an iOS device at an Apple Store.
- Now, choose one of them to set up with the new password Apple ID.
Recover a Forgotten iPad Passcode
If you face hurdles during recovering a forgotten iPad passcode, carry out the steps in the same way as explained below:
- Firstly, invoke the desired browser and visit http://www.icloud.com.
- Then login to the iCloud once it is pop-up.
- Click on the ‘Find iPhone’ option.
- Once the map appears, select the ‘All Devices’ option and click on the iPad through the list.
- Once you select the iPad name, you will get a new screen in the map’s corner.
- This screen has three options: The last Mode, play Sound, and Erase iPad.
- Now, select the ‘Erase iPad’ and pursue the steps. This will ask you to confirm the option.
- Once you have done that, the iPad will reset.
- The iPad will require to be connected to the internet and charged for this process.
Deal with the Lost Passcode via iTunes to Repair the iPad Password
If you face hurdles during dealing with the lost passcode using iTunes, carry out the steps in the same way as explained below:
- First, link the iPad to the system you utilize to synchronize and boot iTunes.
- iTunes synchronizes with the iPad and waits to complete the process, then selects the icon of Device.
- You should select the ‘Restore iPad’ option.
- Now, the system removes the iPad and sets up the fresh passcode once it reboots the iPad.
Access the iPad via Recovery Mode to Repair the iPad Password
If you face hurdles during accessing the iPad using recovery mode, carry out the steps in the same way as explained below:
- Firstly, attach the iPad to the system via the cord that is offered with the iPad.
- After that, launch iTunes.
- Long press the Wake or Sleep key and home button over the iPad, then stay pressing once the Apple logo appears.
- Once you view the iPad graphic linked to iTunes, leave the keys.
- Then click on the ‘Restore’ button and pursue the instructions.
- This process takes some time to restore the iPad, which turns off and on during the procedure. After rebooting, you are pop-up to configure the iPad like you did once you bought it.
Now, you should restore it from a backup during this procedure.
Visit: mcafee.com/activate
Source:https://globalsofthelp.wordpress.com/2021/12/03/how-can-i-unlock-my-ipad-if-i-forgot-the-passcode/

Now, Apple TV is used for classrooms, family rooms, and meeting rooms, etc. And you already know it is required to connect above one person. Which means it wants above one Apple ID. It is not simple & powerful like Mac, but it’s better than the iPad or iPhone. So, here are the steps to use multiple accounts on your Apple TV. Let’s get started.
Adding Multiple Accounts to Apple TV
To add multiple accounts to Apple TV, go through the following procedure stated below:
- Go to the Settings app on your Apple TV and open it.
- After that, you should select the Accounts option.
- Then you have to choose the iTunes & App Store.
- Thereafter, you should select Add new Apple ID.
- When the Prompt comes, select Enter New.
- Later, you should input the extra Apple ID username.
- Now, select Continue.
- After that, you should type the secondary Apple ID password.
- Then you have to Log In.
Move Between Multiple Accounts on Apple TV
To move between multiple accounts on Apple TV, go through the following procedure stated below:
- Get started by opening Settings on your Apple TV.
- After that, you should select Accounts.
- Then you have to choose the iTunes & App Store.
- Now, you should select the account you would like to use.
Using Control Center to Move Between Users on TvOS 13 to Add Multiple Accounts on Apple TV
To use the control center to move between users on TvOS13, go through the following procedure stated below:
- To get started, press the Home/TV button firmly on your Siri remote.
- After that, navigate to the Control Center & switch users at the upper right-hand side of the screen of Apple TV.
Move the Apple TV to Sleep Using Control Center to Add Multiple Accounts on Apple TV
To move the Apple TV to sleep using the control center, go through the following procedure stated below:
- To begin with, press firmly the Home/TV button on your Siri remote to bring up the Control Center on Apple TV.
- After that, you should choose Sleep.
Modify the Apple TV’s Audio Destination with Control Center to Add Multiple Accounts on Apple TV
To modify the Apple TV’s audio destination with the control center, go through the following procedure stated below:
- First, you have to go to the Siri remote & press firmly the Home/TV to bring up the Control Center on Apple TV.
- After that, you should choose the Audio icon.
- Then you have to move down and then select the new audio selection.
Browse with Control Center on Apple TV to Add Multiple Accounts on Apple TV
To browse with the control center on Apple TV, go through the following procedure stated below:
- First & foremost, navigate to the Siri remote & press firmly the Home/TV button to bring up the Control Center on Apple TV.
- After that, you should choose the Search icon.
- Now, enter or use Siri to browse.
Visit: mcafee.com/activate
Source:https://globalsofthelp.wordpress.com/2021/12/03/how-to-add-multiple-accounts-on-your-apple-tv/
Most Snapchat users around the world are facing problems while sending and receiving Snaps around 12:30 AM ET. DownDetector found the issues related to Snapchat and further blamed them on its services, as mentioned above. Is Snapchat working for you? If it’s not working for you, here are some tips you can apply to fix it. The ways and guidance to solve the Snapchat-related problems may vary if you use a Pixel 4a that runs on Android 11 and Snapchat Android app version 11.44.0.37.
Follow this simple guide to fix any problem related to Snapchat issues.
How to check that Snapchat is not working for you
You can use some super tools to check whether Snapchat is down for you or everyone. DownDetector is a reliable website that can fit all kinds of services and for all places. To do so, you can go to the Downdetector Snapchat page to find whether it is down or not. Further, you can Live Outage Map to check the Snapchat down for a particular area.
You can also use the official Snapchat Twitter support account to update you with any Snapchat outages and how long they will take to recover.
The simple ways to the Snapchat issues
When you find that Snapchat is not working correctly, you can follow the below-mentioned simple steps to fix these issues.
Restart your phone
Restarting the phone may solve many unknown tech problems, and the same logic applies to Snapchat as well. When you follow this trick, you may resolve Snapchat not working instantly. However, if it doesn’t work, you should move to applying other tricks. Not only for Snapchat issues, but this trick also works for most tech problems on your device.
Reinstall Snapchat app
First, you uninstall your Snapchat app from your device and then install it again from Google Play Store. This trick can also bring your Snapchat to normal functioning. Before you uninstall the app, you can consider closing or logging out of the Snapchat app. Most probably, this trick resyncs your local Snaps with the server and fix the issue.

Check Internet Connection
Some users are also facing problems in sending and receiving Snaps, or while loading Snapchat, there might be internet issues. You can check it by opening other internet-based apps on your device. If nothing else works for you, it may have some internet issues. You can try the internet connection using both mobile data and Wi-Fi.
Sometimes Snapchat stops working if it detects a VPN or any third-party apps on your device. So, it starts working if you consider disabling VPNs or any third-party app on your mobile while you are on the Snapchat app.
Check for the Snapchat app update.
You may face problems with the Snapchat app if you are using an old version. Your Snapchat may stop working/responding if there is a significant app update. To check for an update, go to the Google Play store and check if any update is available or not. If you find it there, download it, and most probably, the update can resolve the issue.
Visit: mcafee.com/activate
Source: https://globalsofthelp.wordpress.com/2021/12/02/tips-to-resolve-snapchat-not-working-issue/
You can purchase the new 14 and 16-inch Macbook M1 Pro laptops. The MacBook M1 Pro has a processor that represents a new pathway for these laptops. The laptops have exceptional performance, durable battery life, and a bright display. These improvements are worth pointing out. Here are a few reasons to upgrade or purchase a new MacBook M1 Pro laptop.
LED Display
The Liquid Retina XDR display provides vibrant, sharp, and clear images. The colors feel like popping off the screen during a 4K HDR movie. The display also offers a 120 Hz refresh rate. As a result, you will also get smooth action scenes during the movie night.
The LED screen emits up to 1600 nits which are also quite bright. The maximum brightness is up to 1600 nits. It also provides better graphic-intensive tasks.
Ports
It has every kind of port that you want to use in the MacBook M1 Pro. Previous MacBooks only had USB-C ports. You will also get the MagSafe charging port. It attaches the charging cord magnetically.
The MacBook M1 Pro laptop also has three thunderbolt ports, a headphone jack, an SD card reader, and an HDMI port. The SD card reader is essential to transfer photos.
Performance
It acts like a beast when you talk about the performance. You can perform multitasking without any lag. The AAA titles games run smoothly. You can get up to 32 GB of RAM in the 14-inch Macbook M1 Pro device.
The multi-core performance provides the best score during benchmark testing. The laptop is a sure winner in terms of performance. It is faster than the Intel processors and offers a much better battery life.
The laptop also offers more RAM and Storage. It has new SSD models, and the SSDs are two times faster than the previous generation. You will also get up to 7.4 GB/s read speed.

Webcam
Meeting and video conferencing became an essential tool for working professionals. The new MacBook M1 Pro comes with a 1080p camera setup. You will also get clear and bright images with more details.
The 1080p webcam will provide the best look during chat and work meetings.
Battery Life
The 14-inch MacBook M1 Pro laptop provides an impressive battery life. It would help if you had a long-lasting laptop to work from home. It can offer you 12 to 14 hours of battery life if you work on a web browser. The battery life in the MacBook M1 Pro is also enough for an entire day.
Other Reasons to buy the MacBook M1 Pro:
There are several other reasons to purchase the MacBook M1 Pro:
- Upgraded Keyboard.
- Better Audio Output.
- Great Form Factor.
- Fast Charging Support.
- Connectivity Ports.
- Powerful Processors.
- Increased Storage and RAM options.
Conclusion
MacBook M1 Pro is a next-generation laptop from Apple. It also includes a vibrant display, thinner bezels, fast performance, and more. If you are willing to expanse money, getting a working laptop with serious performance is the best option.
Visit: webroot.com/safe
Source: https://offers1webroot.com/blog/top-reasons-to-buy-apple-macbook-m1-pro

Well, most of us have come across the term ‘refurbished’. What does it mean when you explore phones online? You probably have come across this term when you navigate through various mobile phones. Well, a refurbished phone is part of your discount category; as we know, most of us want phones or any item at discounted prices but have you bought a refurbished phone to get it at discounted prices? We try different ways to get things at discounts; we wait for occasional sales, pay in retail, and buy refurbished phones.
If you don’t know exactly what type of phones these are, then keep reading this post as we are discussing these phones in detail.
Refurbished phones 2021
A refurbished phone is a phone that was sold as new, but it returned to the manufacturer for any reason but now is ready again to be sold in the market. Different terms are given to these phones, such as ‘reconditioned,’ pre-owned, or recertified; there might be some defect or drawback that the manufacturer fixes and resells at discounted prices as the phone is not new in the box. You get these phones at discounted prices; however, finding the best-refurbished phone is pretty challenging.
Things to keep in mind while shopping for refurbished phones
Refurbished phones are reconditioned or recertified, and why they came into a refurbished category is unknown to us. Therefore, whenever you head to buy these phones, you should follow the given below tips.
Buy from a certified or authentic source
it would help if you shopped refurbished from a well-known certified source as they cover you with the guarantee for the refurbished phone. Also, there is no fear of being caught in any way. The certified or sources always try to list the good working condition phones.
Check for the accessories
Whenever you buy a refurbished phone, it is essential to check its accessories as these are second-hand phones, and therefore, there might be different/unmatched accessories. For example, check for the phone and the charger if they are of the same company and exact model. If the accessories are not matching or are defective, it might affect your phone later.
Check warranty offered
Check whether the phone you are buying provides a warranty or not. To get the warranty, you should buy refurbished phones from certified sellers.
Check out the return policy, if any.
Please buy a refurbished phone that has a product return period or refund policy. So, don’t forget to read the return policy.
The best places to buy refurbished or pre-owned phones
Please go through our list of the places from where you can buy a refurbished phone.
Amazon
Amazon is the best place for buying or exploring refurbished phones. It has incredible refurbished phones with great deals and offers. Tap the brand you want to buy a refurbished phone for and research from many phones available there. You can get from the most affordable to costly mobile phones there.
Best Buy
Best Buy is a great online platform to shop from its wide variety of branded refurbished new phones. From Best Buy, you can get pre-owned and open-box phones; both are under the category of refurbished phones.
The advantage of buying from Best Buy is that you can pick a refurbished phone from your nearby local stores.
Generally, you get discounts of up to 30% at various brands as these are just open-box phones and not old ones.
Verizon
It is another important place to buy new and old phones. It is a great place to purchase pre-owned phones as it has a small selection of pre-owned devices. Another great advantage of buying from Verizon is that it provides a 90-day warranty. That is what the buyers love, and they become confident over their purchase.
T-Mobile
T-Mobile is a platform from where you get branded as well as warranted phones. Generally, it sells Samsung and LG phones with a 90-day warranty, same as Verizon; however, it follows an 80-point inspection procedure. Why wait? Navigate the site from the comfort of your home.
Gazelle
Gazelle is a popular place for reselling/buying your old phone/refurbished phones. You can buy here with confidence as it has a lengthy inspection procedure and provides a 30-day return policy. In addition, it also runs seasonal offers, and you can pick the most affordable device here.
Declutter
Declutter lists the pre-owned or refurbished phones at excellent prices and deals. It is a fantastic place to buy refurbished phones as it offers a 12-month on every phone they sell. All devices go through a 70-point inspection before listing them. They list device conditions such as good, poor, and faulty; you can choose the state you want and then move ahead with your purchase. So, you get a clear idea about the device and what damages it has.
Visit: norton.com/setup
Source: https://nort0n1.com/blog/best-online-storeswebsites-to-buy-refurbished-phones-2021

All mobile gamers know the importance of gaming accessories and their role while playing the games. It is quite an annoying experience if your gaming session gets interrupted because of inadequate gaming accessories. Usually, the gaming sessions get interrupted when your phone has a low battery, poor quality headphones, and a controller. But, don’t fret! As in this post, you will know the best and affordable Android phone gaming accessories. Go through our top gaming accessories that will make your gaming experience more enjoyable and speedier.
Game controller
When it comes to gaming on any device, the game controller is an essential instrument. Razer Raiju gaming controller has one of the best Bluetooth controllers for your Android phone. It has outstanding features that help in customizing control profiles, and also it connects instantly with two phones through a wired connection.
Phone Grip
Phone grip is not a unique accessory for mobile gamers as it helps hold the phone, and you can avoid hand pain. If you are a regular mobile gamer, you must have experienced the annoying palm pain after your game. This grip will provide rest to your hands, and you can enjoy the gaming more.
Phone Stand
Phone stand is another accessory that holds the phone at a right angle to your eyes and you can also adjust the angle anytime with Lamicall adjustable phone stand. You can get lots of phone stands in the market however, this stand is quite reliable, adjustable, and easily portable.
Cleaning cloths
As we know cleaning extends the life of gaming accessories and keeps them in good functioning. If you want to clean your gaming device clean, you should pick the perfect cleaning cloths. So, get the clean magical fiber cloths, gaming accessories for Android phones online.
Micro SD card
As you know, a Micro SD card can store more games on phones which are not available on the Google Play store. However, all phone does not support a micro-SD card, buy a micro-SD card if your phone supports it to experience the new games. A micro-SD card is part of your gaming accessories for Android phones.
The gaming accessories choice vary from gamers to gamers based on their needs. You need a controller as the touchscreen usually makes your experience annoying. An android controller is more needed when you play on the mobile. As it provides rest to your palm, you get better game control with it as compared to the touchscreen. The next thing you need is a high-quality headphone that will add value to your gaming; it helps in avoiding outside noise and disturbance. Furthermore, you need a portable charger to keep your battery charged during the gaming session.
Gaming accessories for Android phones are available on different renowned sites and their prices may differ a little bit. However, you can get most of the branded accessories from Amazon.
Visit: mcafee.com/actvate
Source: https://mcafle.com/blog/best-gaming-accessories-you-should-have-in-2021

The Lenovo Smart Clock is the brand's smallest smart display, despite its reputation for producing some of the greatest laptops and tablets. The Lenovo Smart Clock is marketed as a tidy and compact device that is appropriate for a bedside table. The new Lenovo smart clock review offers a 3.97-inch screen and Google Assistant built-in for hands-free timers and alarms, as well as getting the most up-to-date weather information. The screen even provides some additional information beyond what Google Assistant provides audibly. If you ask for the weather prediction, for example, it will give you the day's temperature, but you can see an hour-by-hour breakdown as well as the maximum and minimum temperatures for the day on the screen.The Lenovo Smart Clock is backed by Google Assistant and can answer questions that begin with the phrase “Hey, Google.
Lenovo Smart Clock Cost and Availability
The Lenovo Smart Clock costs $ 79.99 / £ 79.99 / AU $ 129, however it is frequently discounted by 25-50 percent during sales.
Lenovo Smart Clock Design
The Lenovo Smart Clock aspires to be a smarter version of your classic alarm clock, but it's much more. It's an inexpensive way to add a Google Assistant smart home speaker to your bedroom, complete with a clock face and a personalized 'Good Morning' dashboard. It has a compact design with a small 4-inch touchscreen that displays the time. It features a 480 x 800-pixel screen resolution, which is enough for what it's aiming to show at such a compact size. the AI-powered speaker is most suited for a bedside.
The Lenovo Smart Clock has an elegant wedge-like design and is wrapped in a gray fabric mesh. It measures 3.14 x 4.48 x 3.12 inches / 7.98 x 11.39 x 7.92 cm (wxhxd). A thick border surrounds the screen, curling around the edges but taking up a significant amount of space on the front face of the device. The volume is controlled by a plus and minus sign at the top. On the backside, there's a microphone mute switch as well as a power and USB port is present.
Lenovo Smart Clock Performance
It's small, but it gives you access to Google Assistant and most of the things you'd expect the voice assistant to accomplish for you. The Lenovo Smart Clock, which has a smaller screen than any previous Google Assistant smart display, has a different UI from other Google-powered products.
Lenovo Smart Clock Specs
The Lenovo Smart Clock features a 4-inch 800 × 480-pixel IPS touch screen as the centerpiece of the 'clock' experience. A MediaTek 8167S processor drives the device, which also includes a single 3W speaker and two passive sound radiators. Wi-Fi 802.11a / b / g / n / ac and Bluetooth 5 are supported by the Lenovo Smart Clock for communication.
Final words
The Lenovo Smart Clock is a compact, helpful device that connects your bedroom. It has a simpler interface and lacks some of the features present on other Google-Assistant smart displays, such as video calling and movie streaming capability. It's a terrific option if you're on a budget or searching for a compact, bedroom-friendly smart display.
Visit: ij.start.canon
Source: https://ijstartsetup.souqbel.com/lenovo-smart-clock-review-a-smart-bedside-clock-for-you/
In Windows 10, one of the most irritating issues you can stumble upon is a black screen because you will not view an error code printed on your screen to get a hint on where to begin troubleshooting. A black screen could occur for several reasons. It might be associated with a problem with a current graphics driver update, or it could happen during the installation of a feature update that adds a compatibility issue. It could also arise as a result of a buggy system update. Or it could be a hardware associated problem with the screen, video adapter, or connection. If you want to repair this issue, then here are some points provided below.
Check your External Devices
To check your external devices, follow these on-screen steps given below:
- Firstly, detach the device through any slot or port.
- Then unplugged every attached peripherals such as external printers, printers, and USB storage.
- You should detach the AC adapter through the system.
- Go to the battery slot and remove the battery.
- Now, long-press the Power key for a minimum of 15 seconds.
- After that, place that battery into its slot and connect the AC adapter.
- Later, reboot the system.
- Once you have done, you might be taken to a startup menu. Select the ‘Start Windows Normally’ option.
Attempt a Startup Fix with a Windows Installation Media
To attempt a startup fix with Windows Installation Media, follow these on-screen steps given below:
- At first, make a Windows 10 clean copy over a USB via the Windows Media Creation Tool.
- Then boot from the freshly made flash drive.
- You should launch the option of ‘Advanced Startup.’
- After that, select the ‘Repair your computer’ option.
- Now, click on the ‘Startup repair’ option and permit the procedure to complete.

Attempt to Fix Boot Records
To attempt to fix boot records, follow these on-screen steps given below:
- You should start the device and, while the startup procedure, hold the F9/ F11/ F12 continuously.
- Afterward, click on the Troubleshoot option and then pick Advanced options.
- Then choose the ‘Command Prompt’ option.
- Now, the first command to attempt is ‘check disk,’ and hit the Enter button: chkdsk/ r
- After that, try this command: sfc /scannow
- In case the problem continues, perform the pursuing commands and hitting the Enter button individually:
- bootrec /scans
- bootrec /fixmbr
- bootrec /fixboot
- bootrec /rebuildbcd
- Now, attempt to reboot the device usually after that.
Disable Fast Startup Function
To disable the fast startup function, follow these on-screen steps given below:
- At first, access the Safe Mode on your system.
- To invoke the Windows search panel, input ‘power settings’ in it and press the Enter button.
- You should click on the ‘Power & sleep settings’ option through the menu.
- After that, select the ‘Additional power settings’ option in the section of Related settings.
- You will get a ‘Power options’ screen and select the option of ‘Choose what the power button does’ through the left menu.
- Later, select the ‘Change settings that are currently unavailable’ option.
- Now, untick the ‘Turn on fast startup (recommended)’ box and then hit the ‘Save Changes’ button to apply the changes.
Utilize the Windows + P Shortcut
To utilize the Windows + P shortcut, follow these on-screen steps given below:
- First of all, start the system and wait until you see the cursor.
- Then hold the Spacebar key over the keyboard and input the password.
- After that, press the Win + P hotkeys simultaneously on the keyboard and down arrow once.
- Finally, hit the Enter button and keep redoing the instruction until the issue is fixed.
Visit: ij.start.canon
Source: https://ijstart-ca-non.wordtypo.com/how-to-fix-a-black-screen-after-bios-update/
Plenty of radio apps are out there that you can use for listening to the latest music. But it’s not an easy task to decide which one you should be using on your device. Don’t worry! We are here to help you. In this article, we will introduce you to some of the best radio apps available right now. So without wasting much more time let’s take a look at them. Here we go!
AccuRadio
AccuRadio is a fantastic radio app with more than 1000 customizable radio channels. The platform is not as popular as other radio apps, but it will give you an excellent experience. You can do a lot of other things on the app, such as blocking the artists and songs you don’t want to listen to, customization, and more. The app works very well and is available completely for free to use, but it contains ads.
iHeartRadio
iHeartRadio is a fairly popular radio app loaded with a bunch of features and radio stations to listen to. The app even has its own stations. You can access other FM stations too. Besides that, the app provides you with a variety of seasonal playlists, including Halloween, Christmas, and more. It has a straightforward user interface, so you won’t face any problems while using it. The app even has Android Wear and Chromecast support. However, it works very nicely and is available for free to use with ads, but you can take a subscription to its premium version if you want. It will cost you $5.99 per month.
myTuner Radio
myTuner Radio is another great radio app that boasts a collection of more than 50,000 radio stations from 200 different countries. The app provides you with a variety of features, including support for Chromecast, a sleep timer, an alarm function, various categories of talk shows and music, and more. It even has support for most streaming sticks including Sonos and Android Auto. The app runs very nicely. You can use this app for free if you have access to Google Play Pass.
Pandora Radio
Pandora Radio another very popular radio app that offers you a variety of radio stations and playlists to listen to. You can even create your own stations or playlists and listen to your favorite music. Pandora Radio is available for free, but the free version of this app contains ads. However, you can remove ads and get extra features by taking a subscription to its premium version; it will cost you $4.99 per month.
Radio Online
Radio Onlineis a pretty decent radio app that provides you with tons of radio stations to listen to almost all kinds of content. The app has a pretty simple UI and is available for free. However, there is a premium version of Radio Online that will cost you $4.99 for a yearly subscription, but it will add some additional features to the app such as a sleep timer, a live radio recording feature, etc.

SiriusXM
SiriusXM is a pretty amazing radio app loaded with more than 150 channels on various categories, including sports, music, and more. There is nothing much to tell about this app, it works very well and you can use it for free. However, there is a premium version of the app; it basically offers three different subscription models to choose from, you will get extra features based on what plan you are choosing.
Spotify
Spotify is an excellent music streaming app that has become so popular in a very less period of time. The app provides you with a variety of streaming services, including radio, music, podcasts, sports, etc. It has various artist-specific stations and playlists. The app is available for free, and the best thing is that you get almost all radio features on the free version. However, if you need other extra features, then you will have to take a subscription to its premium version that will cost you $9.99 for a month.
XiiaLive Internet Radio
XiiaLive Internet Radio is another pretty decent radio app with more than 50,000 live radio stations and various organizational features. The app even boasts a lot of themes, an equalizer, Bluetooth options, data management features, and many other things. The best thing about this app is that it allows you to add your own radio station links. It has a pretty simple UI and it works very nicely. You can use it for free.
These are all the radio apps that we recommend you use on your device, they all work fantastically and most of them are available for free to use. That’s all for this article. Thank you for reading it.
Source: https://a1norton.uk.com/the-best-radio-apps-you-can-use-in-2021/
Visit: norton.com/setup | www.norton.com/setup
The brand new flagships, the OnePlus 9 and the OnePlus 9 Pro have finally come into the market; both devices are packed with fantastic specs and hardware. But are they worth buying products? In this article, we will only cover the OnePlus 9 Pro, so if you are planning to buy this Smartphone, you should read the whole article and then decide whether this device is suitable for you or not. So without wasting much more time, let’s take a detailed overview of the OnePlus 9 Pro. Here we go!
Design
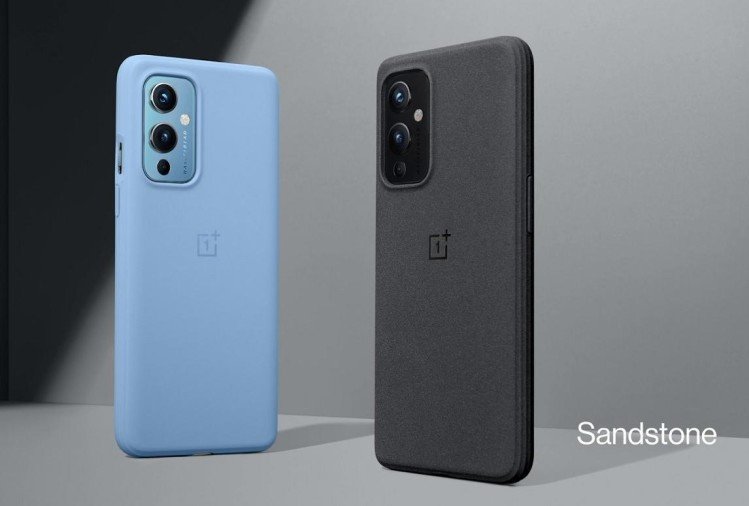
OnePlus 9 Pro comes with a 6.7-inch LTPO OLED display protected by Gorilla Glass 5 (front and back). It features an aluminum (frame), in-display fingerprint, alert slider, stereo speakers with Dolby Atmos, and an IP68 rating. The device has two 3D curved glass panels and both of them are protected by Gorilla Glass 5. The design of the device is outstanding; it feels very nice in the hand.
Display
OnePlus 9 Pro features a 6.7-inch LTPO AMOLED display with a punch-hole, a 2,400 × 1080 resolution, 402 PPI, 120Hz refresh rate, and a 20.1:9 aspect ratio. The display of the device is very smooth, bright, and vibrant, it automatically switches refresh rate based on what apps you are using.
Specifications
The Smartphone features Qualcomm’s Snapdragon 888 chipset, 8GB/12GB of RAM, and 128/256GB of storage. The processor in the device is very powerful, so it doesn’t matter where you take an 8GB or 12GB option, you will easily play the game, browse, and do other tasks.

Camera
OnePlus 9 Pro features a 16MP front camera and a quad-camera setup at the back. The sensors on rear cameras are 48MP, 50MP, 8MP, and 2MP. Well, in terms of performance, the cameras are excellent, they record 8K videos at 30fps and 4K videos at up to 120fps. The cameras even have very balanced exposure.
Battery
The device comes with a 4500mAh battery. It boasts Wrap Charge 65T support, support for reverse wireless charging, and Warp Charge 50W wireless. The device gets completely charged in less than 29 minutes. You can charge it to 75% just in 20 minutes.
Conclusion
OnePlus 9 Pro offers excellent specs, a fantastic display, a great battery, solid build quality, and remarkable hardware. It is a multi-purpose Smartphone; you can use it for gaming, photography, video recording, and various other things. I think this is a worth buying Smartphone and you should consider buying it.
That’s all I had to share about this Smartphone, I hope you liked this article. Thank you for reading it. Have a great day!
Source: https://a2setup.co.uk/oneplus-9-pro-review/
Visit: norton login | norton signin
Amazon Fire TV Stick is one of the most popular and widely used media streaming devices, and it is developed by Amazon. This media streaming device comes in a USB flash drive/pen drive shape that you can plug into your smart TV’s HDMI port. Due to its manageable size, it’s pretty easy to carry it anywhere with you. With this device, one can stream TV shows, movies, and any of their favorite videos on their smart TV. There are millions of people worldwide who prefer to use this product to fulfill their entertainment purposes. And now, it has become one of the top home electronic appliances that one can use. Accessing this device is pretty simple. And even though the Fire TV Stick runs a highly modified version of Android, there are still many Google apps that are not supported by this device.
Source:https://pcmagspot.com/heres-how-you-can-install-chrome-on-your-fire-tv-stick/
Fortunately, Google Chrome is one such app that one can install and access on this device. Do you also use an Amazon Fire TV Stick? Want to install Chrome on your streaming device but don’t know how to do so? If you don’t know the way for installing Google Chrome on your Amazon Fire TV Stick, then you are on the right path now. Here, we are going to show you how you can install Chrome on your Amazon Fire TV Stick. So, please read the full post to get to the method for performing this task.
The Procedure for Installing Chrome on Amazon Fire TV Stick
Although the Amazon App Store offers a great variety of apps to its users for their Fire TV devices, there is just one drawback. It lacks a variety of web browsers. And Chrome has always been one of the most popular web browsers. A lot of people prefer to use only the Chrome browser on all of their devices. And if you also want to install Chrome on your Amazon Fire TV Stick device, you must follow the below-mentioned instructions. Please make sure you follow all the steps carefully.

The Steps for Installing Chrome on Amazon Fire TV Stick
Here’s how you can install Chrome on your Amazon Fire TV Stick device:
- First of all, you will have to download the Chrome APK setup on your Fire TV device. And make sure that you download the latest version with the parameters, “arm64-v8a + armeabi-v7a,” or “Android 7.0+,” and “nodpi.”
- And now, you will proceed by transferring the APK file to your Fire TV using an app named “Send Files to the TV app.”
- And after you are done transferring the APK file, you will have to launch the “Total Commander” app on your Fire TV.
- Now to locate the Chrome APK file, navigate to the “Downloads” folder.
- Click on the APK file and then select the option of “Install.”
- And after this, you will reach the next page, where you will need to allow Total Commander app for installing unknown apps.
- Next, click on the “Install” option one more time.
- And after you are done installing the “Chrome” browser, you are now ready to use it on your Fire TV Stick.
So, that is how anyone can install the Chrome browser on a Fire TV Stick. Try the steps now, and if you face any problems, you can reach us on our website.
Visit: norton signin
Using internet services on any of our devices without any antivirus protection can lead to virus attacks. And that can also lead to the loss of our data. Times are unpredictable, and we never know who has their eyes on our online activities. And we all store all of our essential documents and files on our devices. Smart devices and internet technology has made everything much easier and comfortable for us. Now, we can perform any tasks with just a single tap or click on our devices. But the excessive use of the internet can also harm us if we don’t use it with care. These days, antivirus software has now become important for everyone. Whether you use a computer system or any mobile device, scanning them from time to time is essential nowadays. This way, you will be able to protect your data and your devices.
Source:https://a2setup.co.uk/heres-how-to-install-norton-security-online-extensions-on-a-windows-pc/
Speaking of using any antivirus software program, no doubt that Norton SecureAnywhere is the best antivirus software among all others. It consists of several great security features that ensure your devices’ safety from all cyber threats like viruses, malware, spyware, and all other unwanted programs. And anyone can easily install and set up this antivirus software on their Windows PC. Along with this, installing online extensions for Norton antivirus on a Windows PC is also easy. See the full post to get the methods for performing this task.

The Procedure for Installing Norton Security Online Extensions on a Windows PC
Any Windows PC user can easily install the online extensions for Norton antivirus software. In order to do so, you will have to go through the following instructions:
- First of all, launch the Norton antivirus software on your Windows PC.
- On reaching the next screen, navigate to the “Device Security” tab and click on the “Open” button.
- And after reaching the Norton main window, click on the option of “Internet security.”
- Go to the browser drop-down list and click on the “Google Chrome” option and then select the “Set up Now” option.
- Go through the browser protection page and then click on the “Install” option given under the “Norton Safe Web” section.
- And now, a Chrome Web Store page will appear on your screen. Here, you will proceed further by clicking on the “Add to Chrome” option.
- At last, follow the on-screen instructions to complete the extension installation procedure. And that’s it.
So, this is how you can install the Norton security online extension on a Windows PC. Try the mentioned procedure now. And keep visiting our website to get more tech information.
Visit: norton signin